Nginx UI: Quản Lý Nginx Chuyên Nghiệp Qua Giao Diện Web
Trong thế giới quản trị máy chủ, Nginx từ lâu đã là một trong những web server và reverse proxy phổ biến nhất nhờ hiệu năng cao và sự linh hoạt. Tuy nhiên, việc quản lý Nginx thông qua các tệp cấu hình .conf có thể khá phức tạp, đặc biệt là với những người không quen thuộc với dòng lệnh (command line).
👉 Đây chính là lúc Nginx UI xuất hiện – cung cấp một giao diện web trực quan để quản lý Nginx một cách dễ dàng. Trong bài viết này, chúng ta sẽ tìm hiểu Nginx UI là gì, các tính năng chính, cách cài đặt và ứng dụng thực tế của nó.
Nginx UI là gì?
Nginx UI là một công cụ mã nguồn mở cung cấp giao diện web để quản lý và giám sát các máy chủ Nginx. Nó được thiết kế để đơn giản hóa việc cấu hình và vận hành Nginx, cho phép người dùng thực hiện các tác vụ như:
- Thiết lập Proxy
- Quản lý chứng chỉ SSL
- Giám sát máy chủ (Monitor)
- Kiểm tra lỗi (Detect logs)
👉 Tất cả những việc này có thể được thực hiện mà không cần chỉnh sửa trực tiếp tệp cấu hình.
Cơ chế hoạt động
Nginx UI tương tác trực tiếp với các tệp cấu hình Nginx (như nginx.conf hoặc các tệp trong sites-available / sites-enabled) và dịch vụ Nginx trên hệ thống. Ngoài ra, nó còn hỗ trợ các tính năng hiện đại như tích hợp với Let's Encrypt để tự động tạo chứng chỉ SSL, giúp việc quản lý HTTPS trở nên dễ dàng hơn bao giờ hết.
Tham khảo thêm tại:https://nginxui.com/
Các tính năng chính của Nginx UI
Dashboard Trực Quan
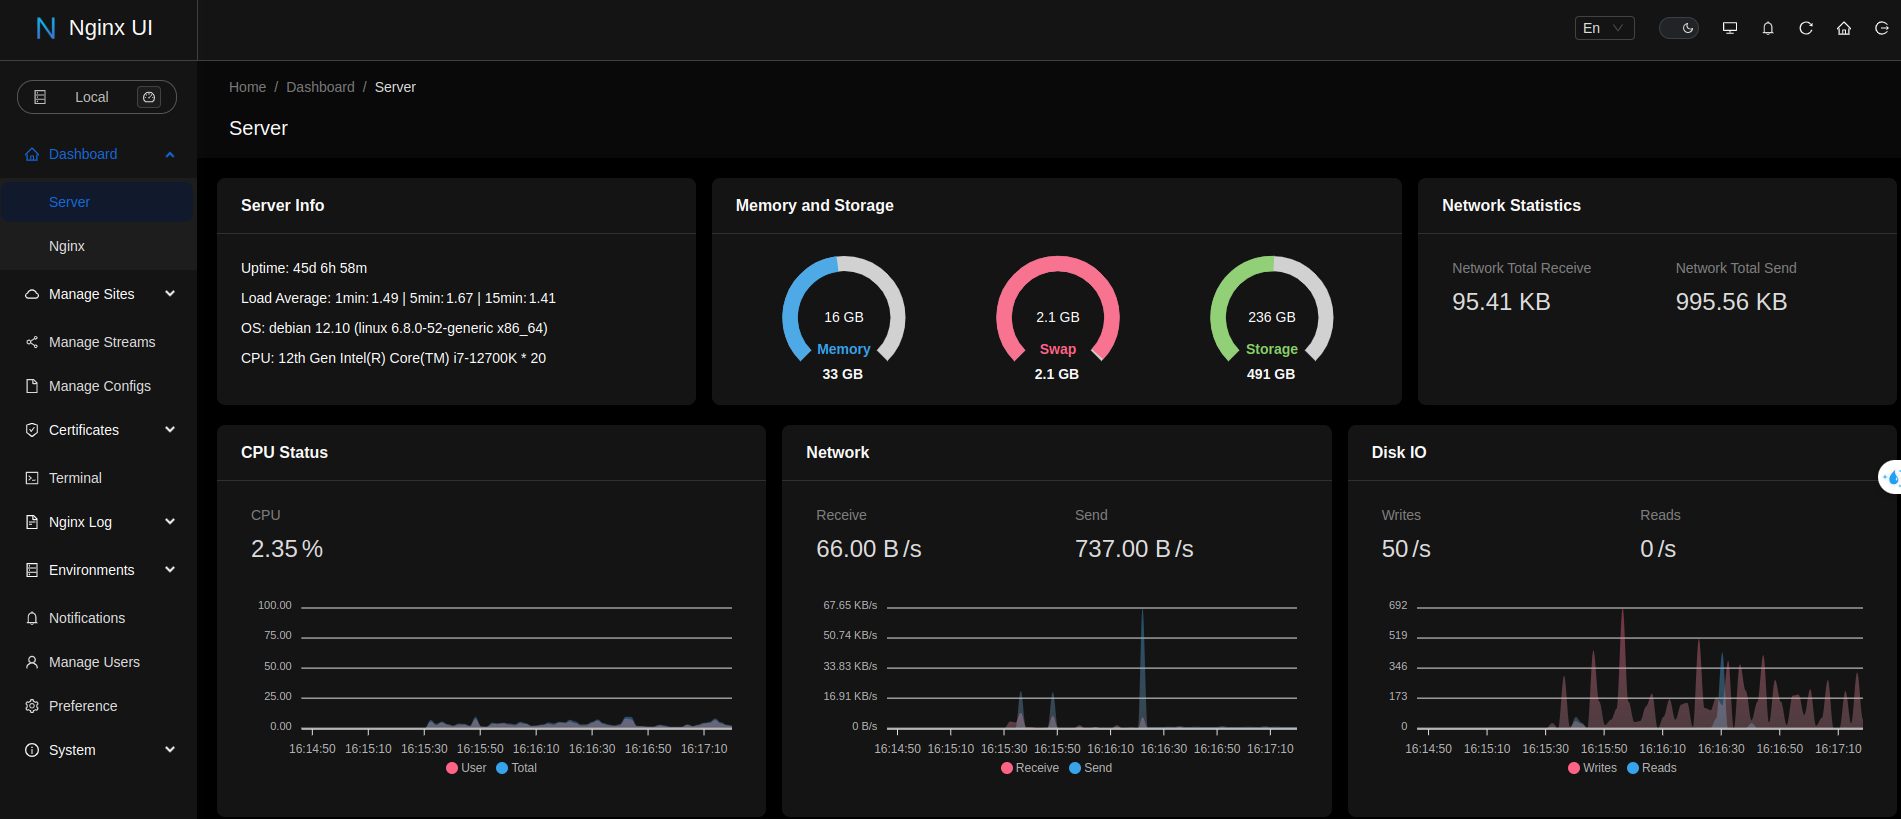
Nginx UI cung cấp một bảng điều khiển (Dashboard) toàn diện hiển thị các thông tin quan trọng để quản lý và giám sát máy chủ:
- Proxy Configuration: Tạo và quản lý Reverse Proxy, Forward Proxy, hoặc các quy tắc điều hướng (Routing rules) cho tên miền và ứng dụng.
- SSL Certificate Management: Tích hợp Let’s Encrypt để tự động cấp phát và gia hạn chứng chỉ SSL, đồng thời cho phép quản lý chứng chỉ tùy chỉnh.
- Server Performance Monitoring:
- Theo dõi mức sử dụng CPU, RAM và Disk.
- Hiển thị trạng thái Nginx.
- Thông tin về các kết nối đang hoạt động (Active connections).
- Log Management: Xem và phân tích Access logs và Error logs, giúp phát hiện sự cố hoặc theo dõi lưu lượng truy cập nhanh chóng.
- Nginx Configuration: Chỉnh sửa cấu hình Nginx trực tiếp qua giao diện web, bao gồm các block như
http,server,location. - Service Management: Khởi động (Start), dừng (Stop) hoặc tải lại (Reload) Nginx ngay từ giao diện.
- System Information: Cung cấp chi tiết về hệ điều hành, phiên bản Nginx và thông số phần cứng.
👉 Nginx UI được thiết kế thân thiện với người dùng thông qua các biểu đồ và bảng biểu, giúp bạn nhanh chóng nắm bắt trạng thái hệ thống mà không cần dùng đến lệnh top, htop hay đọc log thủ công.
Hướng dẫn cài đặt
Việc cài đặt Nginx UI khá đơn giản, đặc biệt nếu bạn đã quen thuộc với Docker hoặc cài đặt thủ công trên các hệ điều hành Linux như Ubuntu, CentOS, Debian.
Dưới đây là hướng dẫn cài đặt Nginx UI bằng Docker Compose (Phương pháp khuyến nghị).
Điều kiện tiên quyết
- Hệ điều hành: Linux (Ubuntu, CentOS, Debian…), Windows, hoặc macOS.
- Nginx: Đã được cài đặt trên hệ điều hành.
- Docker: Cần thiết nếu bạn cài đặt qua Docker.
- Quyền truy cập: Quyền Root hoặc sudo.
Cài đặt qua Docker Compose
- Truy cập qua trình duyệt:
http://<IP-cua-server>:8080
Tải image và khởi chạy Nginx UI:Bash
docker compose up -d
Thêm cấu hình sau vào tệp docker-compose.yml:YAML
services:
  nginx-ui:
    stdin_open: true
    tty: true
    container_name: nginx-ui
    restart: always
    environment:
      - TZ=Asia/Ho_Chi_Minh
    volumes:
      - '/etc/nginx:/etc/nginx'
      - '/etc/nginx-ui:/etc/nginx-ui'
      - '/var/www:/var/www'
      - '/var/run/docker.sock:/var/run/docker.sock'
    ports:
      - 8080:80
      - 8443:443
    image: 'uozi/nginx-ui:latest'
Tạo tệp docker-compose.yml:Bash
touch docker-compose.yml
Mở terminal và tạo thư mục dự án:Bash
mkdir nginx-ui-prj
cd nginx-ui-prj
Tại đây, Nginx UI sẽ kiểm tra các điều kiện cần thiết. Bạn chỉ cần làm theo các bước hướng dẫn để tạo tài khoản admin là hoàn tất!
Lưu ý quan trọng
- Đảm bảo Nginx đã được cài đặt và đang chạy trước khi khởi động Nginx UI.
- Nếu dùng Docker, hãy kiểm tra quyền truy cập (permissions) cho các thư mục
/etc/nginxvà/var/log/nginx. - Cấu hình Firewall để mở cổng
8080(hoặc cổng bạn đã chọn).
Lợi ích khi sử dụng Nginx UI
- Đơn giản hóa quản lý cấu hình: Không cần chỉnh sửa file
.confthủ công. Mọi thao tác Proxy, SSL hay Location block đều qua giao diện web. - Tự động hóa SSL: Tích hợp Let’s Encrypt giúp tiết kiệm thời gian so với việc dùng Certbot thủ công.
- Giám sát dễ dàng: Thông tin hiệu suất và log thời gian thực giúp phát hiện sự cố nhanh chóng.
- Thân thiện với người mới: Ngay cả khi không rành cú pháp Nginx, bạn vẫn có thể cấu hình server một cách chính xác.
- Tăng năng suất: Giúp quản trị viên tiết kiệm thời gian khi quản lý nhiều domain hoặc ứng dụng trên cùng một server.
Ứng dụng thực tế
- Quản lý Reverse Proxy cho nhiều ứng dụng: Nếu bạn chạy nhiều app (ví dụ: WordPress, Node.js, Flask) trên một server, Nginx UI giúp điều hướng traffic dựa trên domain hoặc path cực kỳ đơn giản.
- Ví dụ: Điều hướng
app1.example.comvề Node.js (port 3000) vàapp2.example.comvề Flask (port 5000).
- Ví dụ: Điều hướng
- Kích hoạt HTTPS nhanh chóng: Với vài cú click, website của bạn đã có SSL, cực kỳ phù hợp cho các dự án cá nhân hoặc doanh nghiệp nhỏ không có đội ngũ DevOps chuyên trách.
- Giám sát server cho dự án nhỏ: Freelancer có thể dùng Nginx UI để theo dõi hiệu suất mà không cần cài đặt các công cụ phức tạp như Prometheus hay Grafana.
- Quản lý đa tên miền: Nếu bạn quản lý nhiều website trên cùng một VPS (DigitalOcean, AWS), Nginx UI giúp thêm/sửa/xóa cấu hình mà không lo sai sót cú pháp.
Tổng kết
Nginx UI là một công cụ tuyệt vời giúp đơn giản hóa việc quản trị Nginx – từ cấu hình Proxy, quản lý SSL cho đến giám sát hiệu suất. Với giao diện thân thiện và khả năng tích hợp mạnh mẽ, đây là lựa chọn lý tưởng cho cả người mới bắt đầu lẫn các quản trị viên giàu kinh nghiệm.
👉 Hãy thử cài đặt Nginx UI ngay hôm nay để trải nghiệm việc quản lý server chưa bao giờ dễ dàng đến thế!
Nếu bạn có bất kỳ câu hỏi nào, hãy để lại bình luận bên dưới nhé. Cảm ơn bạn đã đọc bài viết!